
How to Set Up a Firewall in Linux
To keep your computer safe, it is advisable to set up a firewall to prevent others from accessing your computer and protect you from network attacks. However, if you are a new Linux user, you might not know how to configure the firewall in your system. You’ll learn here how to set up a firewall in Linux and how to easily add rules to allow access for other devices in your local network or specific ports.
UFW = Uncomplicated Firewall
We’ll use UFW to manage your Linux firewall since it is easy to use and comes installed by default in many distros.
In Ubuntu, ufw is disabled by default. You can check its status with the command:
If it isn’t active and you want to check whether enabling it will make any difference, use:
To disable the firewall, use:
Check Existing App Rules
To see a list of the applications where the firewall has rules, use:
You can check for the ports that are open for those rules with:
sudo ufw app info APP_NAME
Note: you should type the “APP_NAME” precisely as it appears in the results of the previous command.
Create New Rules
If you want to keep your firewall enabled but allow access to your PC from other devices in your local network, enter:
sudo ufw allow from 192.168.178.0/24
Remember to swap “192.168.178.0/24” in the example for the IP range of your local network.
To grant access only to a specific port, such as port 80, if you are running a local Web server, use:
sudo ufw allow from 192.168.178.0/24 to any port 80

Of course, you can swap “port 80” for any other port you wish.
To open a range of ports in your computer with a single command, you can type:
sudo ufw allow STARTING_PORT:ENDING_PORT/PROTOCOL
For example, to open all ports from 50000 to 52000 for both TCP and UDP for use with torrent clients, use:
sudo ufw allow 50000:52000/tcp
sudo ufw allow 50000:52000/udp
Similarly, if you already opened a range of ports, as was done here for use with the popular Transmission torrent client, and you want to close them, swap the “allow” in the above command to “deny,” like:
sudo ufw deny 51413:51500/udp
sudo ufw deny 51413:51500/tcp

Disable Rules and Reset the Firewall
After you have set up new rules, you can use the status command again to view all the rules.

To be able to delete the rules, you have to use this command first:

The list will now has a number beside each item. To remove a rule, use:
sudo UFW delete RULE_NUMBERFor example:

If you want to delete all your custom rules and revert the firewall to its original configuration, start by disabling it with:
Then, reset its configuration using:
GUFW = A Graphical Interface for UFW
If you find the above complicating, you can make use of GUFW to manage your firewall graphically.
1. Install GUW from your distro’s Software Center or Package Manager.
2. Launch it.
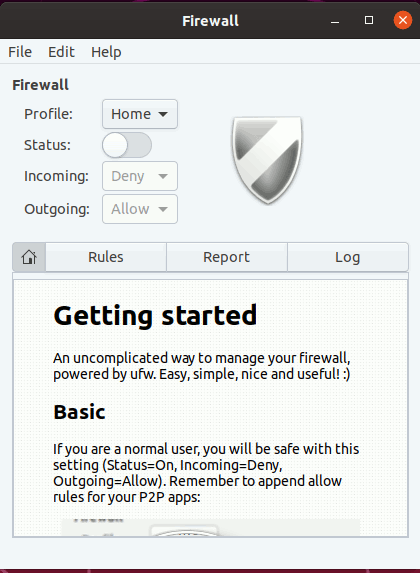
3. To enable the firewall, simply click on the Status switch to enable it. The default rule is to block all incoming connection and allow all outgoing connection.

4. Click on the “Rules” tab and click the “+” button at the bottom. Here you can add rules to your firewall.

Wrapping Up
If you use your PC to access the Internet, we strongly suggest you enable the firewall, creating rules that will allow you to use your computer safely instead of disabling or removing it. If you are really concerned, you can also install antivirus on your Linux machine to make sure no malware can hurt your computer and data.