How to Add a Trusted Phone Number to Your Apple ID
Just like many other tech companies, Apple has implemented “two-factor authentication,” in which you have to verify your login from a trusted device/phone number before you are allowed into your account. This is designed to protect access to your Apple ID account, its purchases, data, etc.
When you enable two-factor authentication on your account, all of your Macs, iPhones, and iPads (which are synced to the same iCloud account) automatically become “trusted devices.” In the event you log in to your account from a new device, you must approve access from one of these trusted devices by entering a code that you receive. This is necessary when setting up a new device, setting up a new credit card or accessing your account on the Apple ID website.
Two-factor authentication also lets you add phone numbers where you can choose to either receive a text message or an automated voice call that speaks that authentication code number, which you can then enter onto a new device.
Although it’s recommended to keep two-factor authentication to yourself, you can add a friend or family member as an extra backup. You should note that a trusted phone number is all that’s needed to gain account access in case you lose your password, so make sure you only add the number of a trusted friend/relative.
You can add a trusted phone number in macOS and on your iOS/iPadOS device by following the guide below.
Adding a trusted phone number on macOS
If your Mac is running macOS Catalina:
1. Open the System Preferences on your Mac and select “Apple ID” from the top row.
2. Click on “Password & Security.”

3. Click on Edit next to “Trusted Phone Numbers” and follow the steps to add the phone number.
If your Mac is running macOS Mojave and earlier:
1. Open the System Preferences on your Mac.
2. Click on iCloud.
3. Navigate to “Accounts Details -> Security.” Click on the “+” button below the Trusted Phone Numbers list. Follow the steps to add and verify the new number(s).
Adding a trusted phone number on iOS
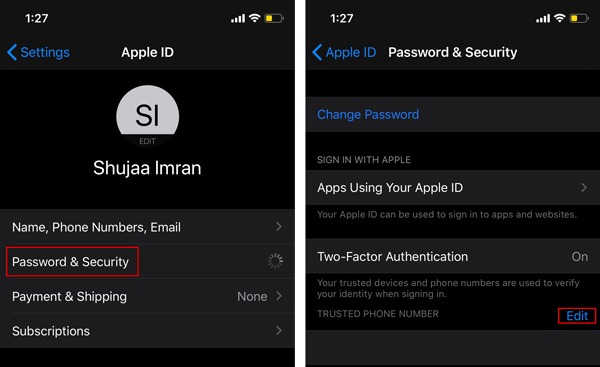
If you have a device running iOS / iPadOS, simply follow these steps to add the trusted phone numbers to your account:
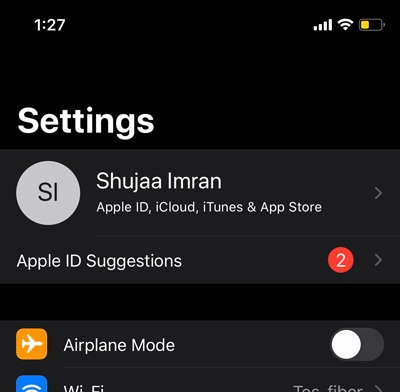
1. Open the Settings app.
2. Tap on your account name on the top of the screen.

3. Select “Password and Security” and tap “Edit” to the right of Trusted Phone Numbers. Follow the steps prompting you to add the phone number.

Adding a trusted phone number on Apple website
You can also choose to add the phone number directly from the Apple website. To do this:
1. Log in to the Apple ID website.
2. Click on “Edit” on the right of Security.

3. Click on “Add Trusted Phone Number” and follow the steps.
That’s it. Apple does have a recovery option in case you lose your account access and don’t have any trusted phone numbers, but it’s a lengthy process and account access isn’t always guaranteed. This is one of the main reasons you should consider having a backup phone number in place on your account.
Found this guide useful? Let us know in the Comments section below.


