How to Add Plugins to WordPress
If you’re going to take your website to the next level, then you need to master the world of WordPress plugins, and in this tutorial I’ll show you how!
By the end of this article, you’ll know how to install tens of thousands of free plugins using WordPress’ built-in plugin directory, how to upload premium plugins to your account, and even how to manually install plugins to wp-content using an FTP client just in case your WordPress hosting provider’s file restrictions make it impossible to install plugins any other way.
What Are WordPress Plugins, Anyway?
A WordPress plugin is a ready-made collection of code that you add to your website, in order to perform a task, add a feature or improve your site’s overall performance. For example, the popular Yoast plugin is designed to boost Search Engine Optimization (SEO), Akismet Anti-Spam protects against spammers, and W3 Total Cache can improve WordPress’ performance by adding browser, page, object and database caching.
While lots of WordPress plugins are safe, reliable and can add real value to your site, they’re still third party software, so you should always download your plugins from a reputable source.
For free plugins, the official WordPress plugin directory should be your go-to source, and can even be accessed directly from the WordPress user interface.
If you’re purchasing a premium plugin from a marketplace or directly from the developer’s website, then you should always check whether users have experienced any problems with this plugin. This research might involve reading user reviews, comments, searching for mentions of the plugin on social media, or even performing a quick Google search to see whether the plug is mentioned on any blogs or third party websites.
Are You Using WordPress.com?
Before we start, it’s important to note that if you’re using WordPress.com then you cannot install WordPress plugins unless you upgrade to a business plan.
If you downloaded the WordPress software from WordPress.org and installed it on your own server, then you can install plugins without purchasing any additional plans.
Install a Plugin Using WordPress Plugin Search
The easiest way to install a free WordPress plugin is via the WordPress plugin directory, which at the time of writing provided easy access to almost 55,000 plugins. The downside is that this directory doesn’t contain any premium content, so if you’re interested in premium plugins then you’ll need to look elsewhere.
To install a plugin via this directory, you’ll need to search for the name of the plugin in question. If you don’t already have a specific plugin in mind, then you may find it easier to explore the WordPress plugin directory in your web browser, until you find the plugin that’s right for you.
To install your chosen plugin via the WordPress plugin directory:
- Log into your WordPress account.
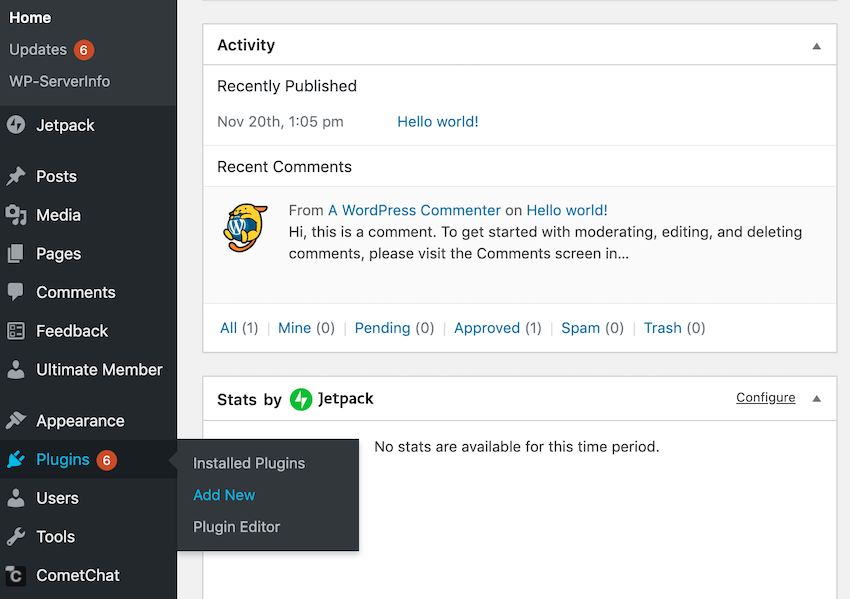
- In WordPress’ left-hand menu, select Plugins > Add New.

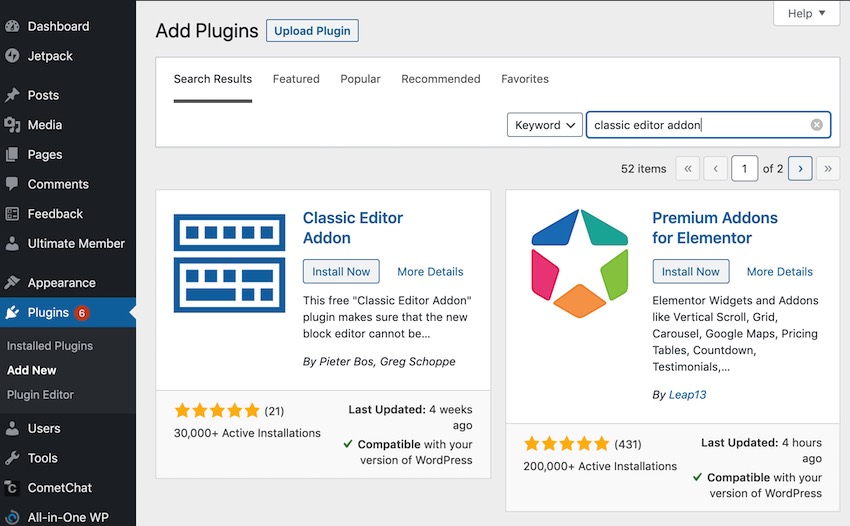
- Search for the name of the plugin that you want to install. When your chosen plugin appears, click the Install Now button.

• When prompted, select Activate.
Depending on your chosen plugin, you may need to configure some settings before you can start using it. The location of a plugin’s settings may vary, but you can often locate them by selecting the plugin’s name from WordPress’ left-hand menu.

You may also be able to edit your plugin’s settings by selecting Plugins > Installed Plugins from WordPress’ left-hand menu.
Uploading a Plugin to Your WordPress Website
The WordPress plugin directory is restricted to free plugins, but you can find plenty of premium plugins in dedicated WordPress marketplaces such as CodeCanyon, premium plugin repositories, or by purchasing a plugin directly from the developer’s website.
Once you’ve chosen and purchased your premium plugin, it’s time to upload it to your WordPress account:
- Download your chosen plugin from its source, which could be a marketplace, plugin repository or a third party website. This plugin should download to your computer as a ZIP file.
- Head over to your WordPress account and select Plugins > Add New from the left-hand menu.
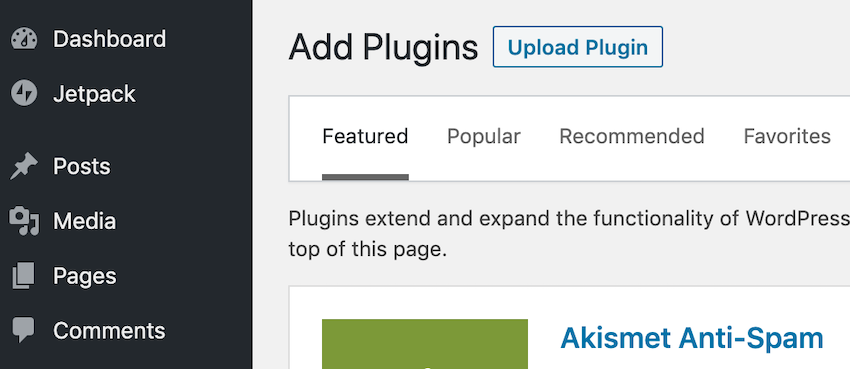
- Select the Upload Plugin button.

- Scroll to the If you have a plugin in a .zip format section, and select Choose file.
- Select the ZIP file that you just downloaded.
- Click Install Now and the plugin will be uploaded to your WordPress account.
- After a few moments, you should see a Plugin installed successfully message; select its accompanying Activate Plugin button.
Once again, you may need to configure this plugin before you can use it. You’ll typically find a plugin’s settings by selecting its name in WordPress’ left-hand menu, and then looking for a dedicated Settings menu.
When you pay for a WordPress plugin, you’ll often get access to online documentation, FAQs, knowledge bases and sometimes even live tech support, so if you’re struggling to configure your plugin then it’s always worth checking the developer’s website to see what resources are available.
How to Install a Plugin to wp-content Using FTP
It’s possible that your WordPress hosting provider may have implemented file restrictions that prevent you from installing premium plugins via the Plugins > Add New menu.
If this is the case with your website, then you can install plugins manually using an FTP (File Transfer Protocol) client, which is a desktop application that connects your computer to your WordPress hosting account.
This method requires your FTP username and password, which you should have received in an email when you signed up for your web hosting account. If you’re using cPanel, then this information is also available via the cPanel dashboard. If you cannot locate your FTP username and password, then you should contact your WordPress hosting provider, as they should be able to help.
To upload a plugin using FTP, first download the plugin’s source file, which will be in ZIP format. Unzip the file on your computer, which should create a new folder with the same name as the original ZIP; this is the file you’ll need to manually upload to your WordPress account.
Now launch your FTP client and enter your username, password and host which is typically your website’s URL—and click the Connect button. Navigate to the wp-content folder within your WordPress installation. This directory typically contains several items, including a plugin directory. The location of this folder tends to vary between hosting providers, so you may need to refer to your hosting provider’s documentation, or contact your provider directly for more information.
Open the /wp-content/plugins/ directory and upload your unzipped plugin to that directory. To verify that your plugin had been uploaded successfully, switch back to your WordPress account and navigate to Plugins > Installed Plugins. Your new plugin should now be listed in this section.
Give the plugin’s Activate link a click.
As with all the previous methods, you may need to configure your plugin before you can use it, so spend some time exploring the plugin’s various settings; you can typically find a plugin’s settings by selecting its name in WordPress’ left-hand menu.
If your new plugin isn’t appearing in WordPress’ Plugins > Installed Plugins section, then:
- Switch back to your FTP client.
- Navigate to the /wp-content/plugins/ directory.
- Delete all the files you just uploaded, and then try re-uploading the plugin again.
How to Remove a Plugin From Your WordPress Website
At some point you may decide that you no longer want to use a particular plugin.
Plugins are third party software, so there’s always a chance that one plugin may clash with another, or an outdated plugin may even become incompatible with a newer version of WordPress. Or perhaps you got carried away installing plugins and desperately need to de-clutter your WordPress account.
If there’s a chance you may need a plugin again, then you can simply deactivate it, but if you want to permanently remove a plugin then you should deactivate and then delete it.
To deactivate a plugin:
- Select Plugins > Installed Plugins from WordPress’ left-hand menu.
- Find the plugin in question, and select its accompanying Deactivate link.
This plugin will now be deactivated. To reinstate the plugin, simply repeat the above steps but this time select the Activate link.
If you want to permanently delete a plugin, then deactivate it using the above steps. At this point you’ll gain access to a new Delete link; give it a click and the plugin in question will be gone forever.
Conclusion
By following the instructions in this article, you can add any plugin to your WordPress website. With almost 55,000 free plugins available via the official WordPress plugin directory and 7,100 premium WordPress plugins available via CodeCanyon, you’ll be spoilt for choice!
Do you have any favourite WordPress plugins? Be sure to let us know in the comments below!


