How to allow pop ups on a Mac
There are plenty of reasons to enable website pop-ups, from making sure tricky functions work properly (including professional and school services) to simply wanting to see everything a trusted website has to offer.
Nothing’s more annoying than looking for that pop-up window when your browser quietly blocked it, so let’s talk about how to allow pop-ups on a Mac for popular browser options.
Enable pop-ups on Safari
The default browser on your Mac makes managing pop-ups very simple. Here’s what to do.
Step 1: While active in a Safari window, head to the upper left corner of your Mac and select Safari, then select Preferences.
Step 2: Preferences will open a new window with a series of settings icons at the top. Look for the icon that says Security, and select it to switch to the Security tab.
Step 3: In Security, look for the section called Web content. You will see several check boxes here, and they are probably all selected to enable JavaScript, allow WebGL, and so on. Look for the box labeled Block pop-up windows and make sure it is unchecked. That’s it! You can now exit out of the window and restart Safari to affect your changes.
Enable pop-ups on Firefox
Firefox is also a very common browser choice for Mac users, especially since it got its revamp in as Quantum. So if you use Firefox, let’s talk about how to enable pop ups there as well.
Step 1: While in a Firefox window, select the menu button — which looks like three lines — and select Preferences.
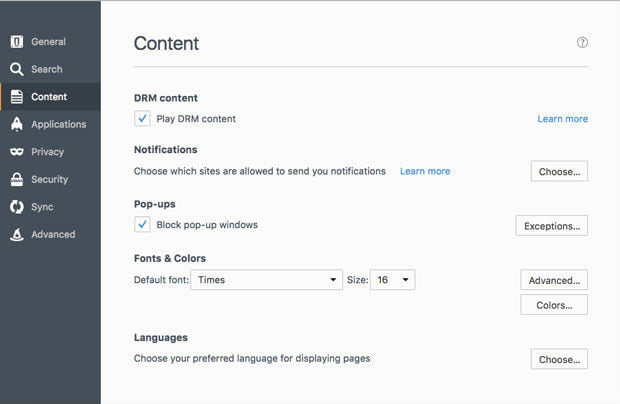
Step 2: Look for the Privacy & Security panel and head there, then look for a section called Permissions. You should see a heading called Block pop-up windows with a check box beside. Uncheck this box to turn pop-ups on entirely.
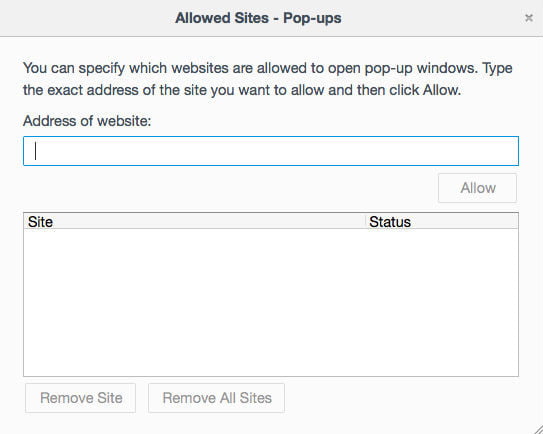
Step 3: You may not want to turn all pop-ups on, especially on more questionable or annoying websites. As an alternative, you can choose to click on Exceptions instead. This will open a new window where you can input a specific site where pop-ups will be allowed. Copy the right address from the address bar (head to the home page of the site to help make this apply to the entire website you are on), and paste it into the Exceptions address form, then select Allow. You can add as many websites as you want to your exceptions, and remove them as needed when you are done.
Enable pop-ups on Chrome
A lot of Mac users also like hopping aboard the Chrome browser, so let’s look at how Chrome manages pop ups and what you can do about them (check out a more in-depth guide here to learn the details):
Step 1: Open up a Chrome browser window and select the three dots at the top right of the window, then select Settings. This will pop open a new tab with settings options: Scroll to the very bottom of this window and select Advanced to progress.
Step 2: Advanced will open up another section called Privacy and security, which you should see immediately. In this section, look for a tab that says Content settings and select it.
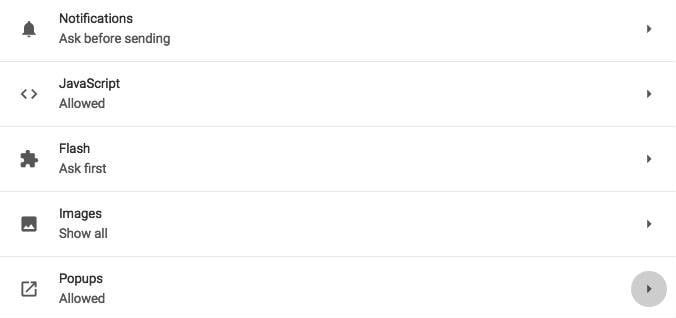
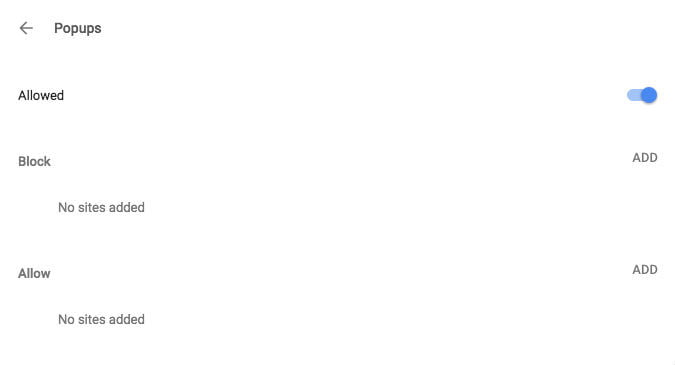
Step 3: This will open up yet another section, which should have an entry called Popups. Select it and it will take you to a new window where you will see an option to switch between Blocked and Allowed. Switch to Allowed to allow all pop-ups.
Step 4: This section also has an option called Allow where you can list individual sites that you want to allow pop-ups from. This will work well if you have another list of allowed sites that you can copy and paste into Chrome and save.
Step 5: You also have an option to automatically allow pop ups from any site you visit on Chrome. When a page in Chrome blocks pop ups you will see a small icon in the address bar called Popup blocked, which looks like a window with an X on it. You can click this icon to allow the pop up or choose to allow pop ups from that particular site.
What about third-party apps?
 You may also use third-party, ad-blocking apps like Adblock Plus to get rid of ads and pop-ups. These apps typically create a little icon on your browser toolbar that show you how many ads are being blocked, etc.
You may need to enable pop-up windows on these apps as well (they try to identify innocent pop-ups, but it doesn’t always work), so when you come to a site where you need pop ups, click on this icon, and look for a way to add the site to your own whitelist or disable the block for that specific site. Most ad-blocking apps should allow you to do this: It’s an important step that you don’t want to forget!


